 This screen has burned itself into my retina.
To follow along this blog post with running code, make sure you've installed the prerequisites. Then:
git clone https://github.com/badlogic/r96
cd r96
git checkout 04-dos-nostalgia
./tools/download-tools.sh
code .
Last time we learned about loading images and blitting. That was over 3 weeks ago, making me miss my target of posting one series entry a week. But there's a reason for it! I was rather busy in those two weeks.
After using Hopper to generate control flow graphs to discuss performance optimization, I got a little sick of the workflow and built my own assembly CFG viewer. Just paste some x86 or ARM assembly generated by MSVC, Clang, or GCC into the left panel, and view the control flow graph of each function on the right. I also made it a re-usable NPM package. Going forward, I can embed those fancy CFGs directly.
Then I drifted off into yet another rabbit hole. Spurred by a mean comment on Reddit about how the r96 code doesn't even run in DOS, I made the code of the series run in DOS.
First, I built a DOS backend for MiniFB. Then, I forked an old GDB version which is capable of remotely debugging 32-bit protected mode DOS programs as produced by DJGPP, the GCC fork I use to build C/C++ DOS programs. I also forked DOSBox-x to fix it up so my forked GDB can actually connect to DOS programs via the serial port/TCP emulation.
Finally, I took the barely functional GDB stub that comes with DJGPP, rewrote it and added a ton of functionality to it, so I can now debug DOS programs running in DOSBox-x from the comforts of Visual Studio Code.
All of that work culminated in a VS Code extension, which lets you go from 0 to debugging a simple DOS mode 13h demo app in VS code in about 80 seconds:
With all of that out of my system, I built some shell scripts that will help you install (almost) all the tools to compile, run, and debug the r96 project for desktop, web, and DOS. And I added some VS Code magic so you can comfortably start debugging sessions on each platform.
And to round it all off, I cleaned up the Git repo, so each blog post maps to exactly one commit. And I rewrote the first 3 blog posts in the series. So yeah.
I can now happily continue writing the series. Promise. Unless I'll add Android and iOS support in the future. I currently don't feel that specific masochism piling up inside of me.
Today, we're looking at DOS support, and then load and draw some bitmap fonts.
Demo: Hello DOS
Alright, go get the latest and greatest from the r96 repository. Follow the README.md to install the tools, including the new DOS tools. The README.md will also get you up to speed on how to build and debug everything in VS Code or on the command line. Or, if you want a detailed run-down of the project and its build and IDE support, read the first entry of the series.
To celebrate DOS support, I've added a new demo called 12_hello_dos.c:
#include <MiniFB.h>
#include <stdio.h>
#include "r96/r96.h"
#include "stdlib.h"
#include <math.h>

#define GDB_IMPLEMENTATION
#include "dos/gdbstub.h"

#define num_grunts 100

typedef struct grunt {
	int x, y, vx, vy;
} grunt;

int main(void) {
	gdb_start();
	r96_image image;
	if (!r96_image_init_from_file(&image, "assets/grunt.png")) {
		printf("Couldn't load file 'assets/grunt.png'\n");
		return -1;
	}

	r96_image output;
	r96_image_init(&output, 320, 240);
	struct mfb_window *window = mfb_open("12_hello_dos", output.width, output.height);

	grunt grunts[num_grunts];
	for (int i = 0; i < num_grunts; i++) {
		grunt *grunt = &grunts[i];
		grunt->x = rand() % 320;
		grunt->y = rand() % 200;
		grunt->vx = 1;
		grunt->vy = 1;
	}
	do {
		r96_clear_with_color(&output, 0xff222222);
		for (int i = 0; i < num_grunts; i++) {
			grunt *grunt = &grunts[i];
			if (grunt->x < 0) {
				grunt->x = 0;
				grunt->vx = -grunt->vx;
			}
			if (grunt->x > 320 - 64) {
				grunt->x = 320 - 64;
				grunt->vx = -grunt->vx;
			}
			if (grunt->y < 0) {
				grunt->y = 0;
				grunt->vy = -grunt->vy;
			}
			if (grunt->y > 240 - 64) {
				grunt->y = 240 - 64;
				grunt->vy = -grunt->vy;
			}
			grunt->x += grunt->vx;
			grunt->y += grunt->vy;
			r96_blit_keyed(&output, &image, grunt->x, grunt->y, 0x00000000);
		}
		if (mfb_update_ex(window, output.pixels, output.width, output.height) != STATE_OK) break;
		gdb_checkpoint();
	} while (mfb_wait_sync(window));

	r96_image_dispose(&image);
	r96_image_dispose(&output);
	return 0;
}
This is our first animated demo!
The demo draws 100 moving grunts, that bounce off of the screen boundaries. Each grunt is stored in a simple grunt struct, which in turn stores the grunt's position (x, y) and velocity on the x- and y-axis (vx, vy) in pixels per frame. During initialization, we give each grunt a random position within the screen boundaries and set its velocity on each axis to 1 (lines 29-35).
What's a frame you may ask? A frame can be many things, but in our case, a frame is simply one iteration of the main loop of your program (lines 36-62). In each frame, we check whether each grunt is still inside the screen boundaries. If a grunt is outside the screen boundaries on the x- or y-axis (or both), we move them back inside the bounds and negate their velocity on the axis they left the screen on.
E.g. a grunt moving to the right (vx = 1), leaving the screen on the x-axis (x > 320 - 64), will be moved back inside the screen boundaries (x = 320 - 64), and its velocity on the x-axis will become -1. Starting in the next frame, the grunt will then move to the left, until it exits the screen boundaries on the left side of the screen. The same happens on the y-axis.
Once all the checks are complete, we add the grunt's velocity to its position. Each frame, the grunt's position thus changes by vx pixels on the x-axis, and vy pixels on the y-axis. Hence why vx and vy are given as pixels per frame.
Note: This is a very basic form of explicit Euler integration. It's much less scary than it sounds! Go learn your fundamentals.
Now, there's one big problem with this type of moving objects: it depends on the speed of execution.
We call mfb_wait_sync(), which waits for a vertical refresh, effectively limiting the number of frames per second to the screen refresh rate, so 60Hz, 90Hz, 120Hz, or whatever other wonky screen refresh rate the display has.
On a 60Hz screen a grunt will thus move 60 pixels per second, on a 120Hz it will move 120 pixels.
For a game, that's not great: different players will experience the game at different speeds, depending on their hardware. We'll look into this issue in a future series entry.
Note: Many old DOS games actually did have this problem: they would not take into account how much time has passed since the last frame, but instead update game object positions at a fixed rate each frame. There's a reason Wikipedia has an entry on the notorious PC turbo button.
Here's the little demo on the web:
And here it is running in DOSBox-x, telling DOSBox-x to go full speed.
DOSBox-x on my system syncs to 60Hz in windowed mode, while Chrome runs the web demo at the full 120Hz of my display. In the video above, there is some smearing and artifacts. That's mostly due to the MP4 encoding and doesn't look like that when actually running the demo in DOSBox-x on your system.
Is the DOSBox-x performance indicative of performance on old systems? No. DOSBox-x is going full speed, which is way faster than what my old 486 could do. However, you can modify the emulation speed via the DOSBox-x menu CPU > Emulated CPU speed. In the following video, I've set the emulated CPU speed to be equivalent to a 486DX2 with 66Mhz:
While that's more accurate, it's still not quite the same as real hardware. To get a more accurate sense of how the program would perform on a real 486, we can use 86Box. 86Box is as cycle accurate emulator for various old x86 systems.
Looks like DOSBox-x isn't far off with its emulation. So why is it so slow?
Note: Setting up virtual machine images for 86Box is a bit terrible. I've created 2 images you can download, a 486 image and a Pentium image, pre-installed with MS-DOS 6.22, a mouse driver, and a CD-ROM driver. You can run them via
86box -c 486/86box.confand86box -c pentium/86box.conf. The images also include QBasic 1.1. AndNIBBLES.BASandGORILLA.BAS. Just saying.
Why is it so slow on a 486?
The MiniFB DOS backend sets up a video mode with either 24-bit or 32-bit color depth through VESA. MiniFB assumes 32-bit color depth, so we have to abide by that and go VESA.
This works pretty well from Pentium class machines onwards, if the (emulated) video card supports VESA. Here's the demo on Pentium class hardware in 86Box:
A 486 may support 24-bit and 32-bit color depth video modes, depending on the graphics card. Mine did. However, that doesn't mean the system is fast enough to actually deal with that amount of data. A run of the mill 486 would have memory throughput somewhere in the range of 10-25MB/s. You read that right.
In our demo above, we render to a 320x240 output r96_image. The call to r96_clear_with_color() has to touch 0.3MB worth of pixels. Rendering a single grunt means reading 64x64x4 bytes from the grunt image and writing them to a 64x64x4 bytes big region in the output r96_image. For 100 grunts, that's reading 1.6MB and writing 1.6MB. Finally, the output r96_image is transferred to the VESA linear buffer, a memory mapped region from which the graphics card will read what it should output to the display. That's another 320x240x4 bytes, or 0.3MB. Each frame we thus touch 0.3 + 1.6 + 1.6 + 0.3 = 3.8MB of memory. And while this simple analysis doesn't account for memory caches, it does align with what we experience when running the demo on a (emulated) 486. We do indeed only get something like 3-5 frames per second, which is 11.4-19MB of data pushed by the demo per second.
That's one of the reasons pretty much all older DOS games targeting 386 or 486 would use mode 13h or derivatives like Mode X. Both of these video modes use 8 bits to encode a pixel's color. But instead of directly encoding the color's red, green and blue component, the 8-bit value is an index into a palette with a total of 256 colors. That cuts down on memory and bandwidth needs considerably.
If we went mode 13h in our demo, we'd go from 3.8MB to 0.95MB of data per frame. That translates to 12-20 frames per second, which is still not great, but often playable enough. That's about the frame rate I got when playing MicroProse's Formula One Grand Prix on my 486.
So what's the solution? Draw less each frame! DOOM and Quake relied on various techniques like binary space partitioning to avoid drawing things that are invisible or occluded. Drawing less means touching less memory. Consider that 100 grunts are about 5.3 screens worth of pixels. That's a lot of overdraw.
Yes, we could probably squeeze a lot of cycles out of the blitting functions if we handcrafted some 32-bit x86 assembly. But DJGPP actually does a pretty good job at producing fast machine code. And I don't want to drop down into assembly land.
Note: modern hardware won't save you from these issues either sometimes. When NVIDIA sent me a prototype Tegra board in the early 2010s, I soon found out that you could only render about 2 full-screen alpha blended rectangles through OpenGL ES before the frame-rate takes a heavy hit.
Excursion: DOS debugging support
When we debug the demo on the desktop, the debugger will spawn the demo process and use system APIs to stop, resume, inspect, and otherwise manipulate the process.
For DOS applications running in DOSBox-x or on a real machine, we do not have the luxury of a debugger. Instead, we use a piece of code called GDB stub that we integrate in our program. Here's how that works in 12_hello_dos.c.
Of note are 3 pieces of code in the demo above, which do nothing on any platform other than DOS. In lines 7-8 we have:
#define GDB_IMPLEMENTATION
#include "dos/gdbstub.h"
This pulls in my GDB stub implementation for DJGPP/DOS, which is a single header file library.
The stub's task is it to communicate with the debugger over the serial port, and tell it when the program has stopped due to a breakpoint, or segfault, or other reason. The stub then waits for commands from the debugger to execute, like setting breakpoints, inspecting memory and CPU registers, stepping, continuing, etc.
This GDB stub type of debugging is a cooperative debugging approach. The stub needs to be integrated with the program itself. This explains the other two GDB related lines of code in the demo.
The gdb_start() function is called at the beginning of main(). It waits for the debugger to connect on the serial port. When the debugger tells the stub to continue execution of the program, the stub stops communicating with the debugger for the time being, and gives back control to the program.
The stub then waits for a system level signal to be raised, like a breakpoint or segfault, for which the stub has registered handlers. If such a signal happens, the stub takes over control from the program again, tells the debugger about the program being stopped, and waits for debugger commands to execute.
The final GDB related line is gdb_checkpoint() in line 61. It is placed at the end of our main loop. This is required so the stub can check if the debugger asked to interrupt the program, in which case the stub will take control of the program again and talk to the debugger.
The GDB stub expects all communication to happen through serial port COM1. Some emulators and virtual machines, like DOSBox-x or VirtualBox, can expose the emulated serial port as a TCP port to programs on the host OS. That's what's happening when we debug a demo in DOSBox-x. DOSBox-x exposes the serial port on TCP port 5123, to which GDB connects via TCP. DOSBox-x will then translate TCP packages to writes to the serial port, which the GDB stub reads from COM1. If the GDB stub writes to COM1, then DOSBox-x will forward the data through TCP to GDB.
In theory, the GDB stub should also work on real-hardware. Sadly, I do not have my 486 anymore, nor a serial cable or a serial port on my MacBook.
If you want to debug any of the demos in DOS, you'll have to add the 3 pieces of GDB stub related code to the demo's sources as outlined above. Only the 12_hello_dos.c demo is currently set-up for DOS debugging. Since our code is cross-platform, there won't be a need to debug in DOS a lot though.
Note: when debugging the demos compiled for DOS, we'll be using DOSBox-x instead of 86Box. Two reasons: getting data into and out of 86Box is very annoying. And there is no serial port over TCP emulation in 86Box, so the debugger couldn't even connect. It should be possible to hook the debugger up with a program running in MS-DOS or FreeDOS in VirtualBox though.
Bitmap fonts
Rendering text these days is really, really hard. When we go zooming around documents or web pages via mouse wheel or touch zoom, we expect text to scale seamlessly and stay crisp. If we want to get fancy, we add kerning and hinting to the mix.
It gets even harder when non-latin scripts like arabic script or CJK script need to get put on a screen. Now you have to deal with (more) ligatures, mixed left-to-right and right-to-left layouting, and various other complexities.
And to top it all off, what you get out of a font file is usually a vector representation of not a character, but a glyph, which can be a character, or a part of a character, and oh my, this is all very complicated.
Thankfully, there are various libraries that can help us draw text. For translating a text string to a set of glyphs, or shaping as it's usually called, you can use HarfBuzz. If you want to rasterize those glyphs, which are usually given in vector form, you can use FreeType. If you want to use your GPU to do most of that, you can use Slug. Your operating system usually also comes with APIs to draw text.
We aren't going to do any of that though. We'll be going somewhat old school and draw inspiration from VGA text mode fonts, but with a 2022 spirit (aka being wasteful).
Before we can look at font pixels, we need to talk about how text is stored in the tubes of our computerers.
Character encodings
Text is composed of characters. When we store text digitally, those characters need to be stored as a sequence of (binary) numbers. When we read characters from a file to draw them to the screen, or translate key strokes to characters, we need to map numbers back to characters. Similarly, when the C compiler encounters a string literal like const char *text = "Hello world", it will convert the characters in the string to a sequence of numbers that gets embedded in the final executable.
Mapping those sequences of numbers to characters and vice versa is what character encodings are for.
One of the oldest character encodings is ASCII. Each character is encoded in 1 byte. Well, actually, ASCII only uses the first 7-bits, so it encodes a total of 128 characters. Well, that's not quite true either. Only 95 of these characters are printable. The other 33 "characters" are what's called control codes. Notable ones are \t or 9, which indicates a tab, and \n or 10, the line feed. See, it's already complicated!
Here are all the printable characters and non-printable control codes contained in ASCII with their (hexa-)decimal codes.
> ascii -d
Dec Hex    Dec Hex    Dec Hex  Dec Hex  Dec Hex  Dec Hex   Dec Hex   Dec Hex
  0 00 NUL  16 10 DLE  32 20    48 30 0  64 40 @  80 50 P   96 60 \`  112 70 p
  1 01 SOH  17 11 DC1  33 21 !  49 31 1  65 41 A  81 51 Q   97 61 a  113 71 q
  2 02 STX  18 12 DC2  34 22 "  50 32 2  66 42 B  82 52 R   98 62 b  114 72 r
  3 03 ETX  19 13 DC3  35 23 #  51 33 3  67 43 C  83 53 S   99 63 c  115 73 s
  4 04 EOT  20 14 DC4  36 24 $  52 34 4  68 44 D  84 54 T  100 64 d  116 74 t
  5 05 ENQ  21 15 NAK  37 25 %  53 35 5  69 45 E  85 55 U  101 65 e  117 75 u
  6 06 ACK  22 16 SYN  38 26 &  54 36 6  70 46 F  86 56 V  102 66 f  118 76 v
  7 07 BEL  23 17 ETB  39 27 '  55 37 7  71 47 G  87 57 W  103 67 g  119 77 w
  8 08 BS   24 18 CAN  40 28 (  56 38 8  72 48 H  88 58 X  104 68 h  120 78 x
  9 09 HT   25 19 EM   41 29 )  57 39 9  73 49 I  89 59 Y  105 69 i  121 79 y
 10 0A LF   26 1A SUB  42 2A *  58 3A :  74 4A J  90 5A Z  106 6A j  122 7A z
 11 0B VT   27 1B ESC  43 2B +  59 3B ;  75 4B K  91 5B [  107 6B k  123 7B {
 12 0C FF   28 1C FS   44 2C ,  60 3C <  76 4C L  92 5C \  108 6C l  124 7C |
 13 0D CR   29 1D GS   45 2D -  61 3D =  77 4D M  93 5D ]  109 6D m  125 7D }
 14 0E SO   30 1E RS   46 2E .  62 3E >  78 4E N  94 5E ^  110 6E n  126 7E ~
 15 0F SI   31 1F US   47 2F /  63 3F ?  79 4F O  95 5F _  111 6F o  127 7F DEL
The codes 0-31 are control codes, including the \t (9) and \n (10) codes we discussed above. Printable characters start at code 32 ( or space) and go to code 126. The final code 127 is another control code.
ASCII is short for "American Standard Code for Information Interchange". Unsurprisingly, the ASCII encoding really only contains characters used in US English, and by coincidence, some other western scripts.
Now, I'm not 'merican. And based on my server logs, chances are good you aren't 'merican either. What about other fancy characters, like 'ö' or 'ê'? Or characters from the arabic or CJK scripts? Well, that's a lot more complicated and historically involves something called code pages, which was and still is an utter mess.
The alternative to code pages is Unicode. Unicode defines codes (or code points in Unicode parlance) for almost 150,000 characters used in scripts from all around the world, including historic ones. It also includes emojis, for better or worse. Your parents' brains have probably also switched to emoji only instant messaging communication. And they said computers would make us kids dumb. Thanks, Unicode.
Unicode has multiple encodings, like UTF-8, UTF-16, and so on. Thankfully, the world has now mostly standardized on UTF-8, for good reasons. UTF-8 is a multi-byte encoding. Depending on the character, we may need 1 to 4 bytes to store it.
For our demos, we'll store text either in C source code as literals ala const char *text = "Hello world", or in text files in the assets/ folder of the r96 project. Both the C sources and text files will be encoded using UTF-8. Anything else would be pain. This means we have to deal with UTF-8 when rendering text.
But as I said earlier, we do not want to go full Unicode text rendering, as that'd require us to integrate all the fancy libraries mentioned above. We want a simpler solution. Enter Unicode's first 256 code points. These code points are split up into 2 blocks.
The first block from code point 0-127 is called the Basic Latin Unicode block. The code points are the exact same codes as used in ASCII, including both non-printable control codes (0-31 and 127) and printable characters (32-126). When encoding text with UTF-8, the resulting sequence of bytes is backwards compatible with ASCII: the first 128 Unicode code points get encoded as a single byte in UTF-8.
The second block from code point 128-255 is called the Latin 1 Supplement block. It contains another set of non-printable control codes (128-159) called C1 controls, which we can safely ignore for the purpose of rendering text. The remaining code points in the block (160-255) include additional characters used in some western scripts. These Unicode code points are encoded with 2 bytes in UTF-8.
Surprise! Those first 256 Unicode code points map directly onto an old code page, namely, the ISO-8859-1 character set. It is sometimes incorrectly referred to as extended ASCII. Here are the characters contained in the set.
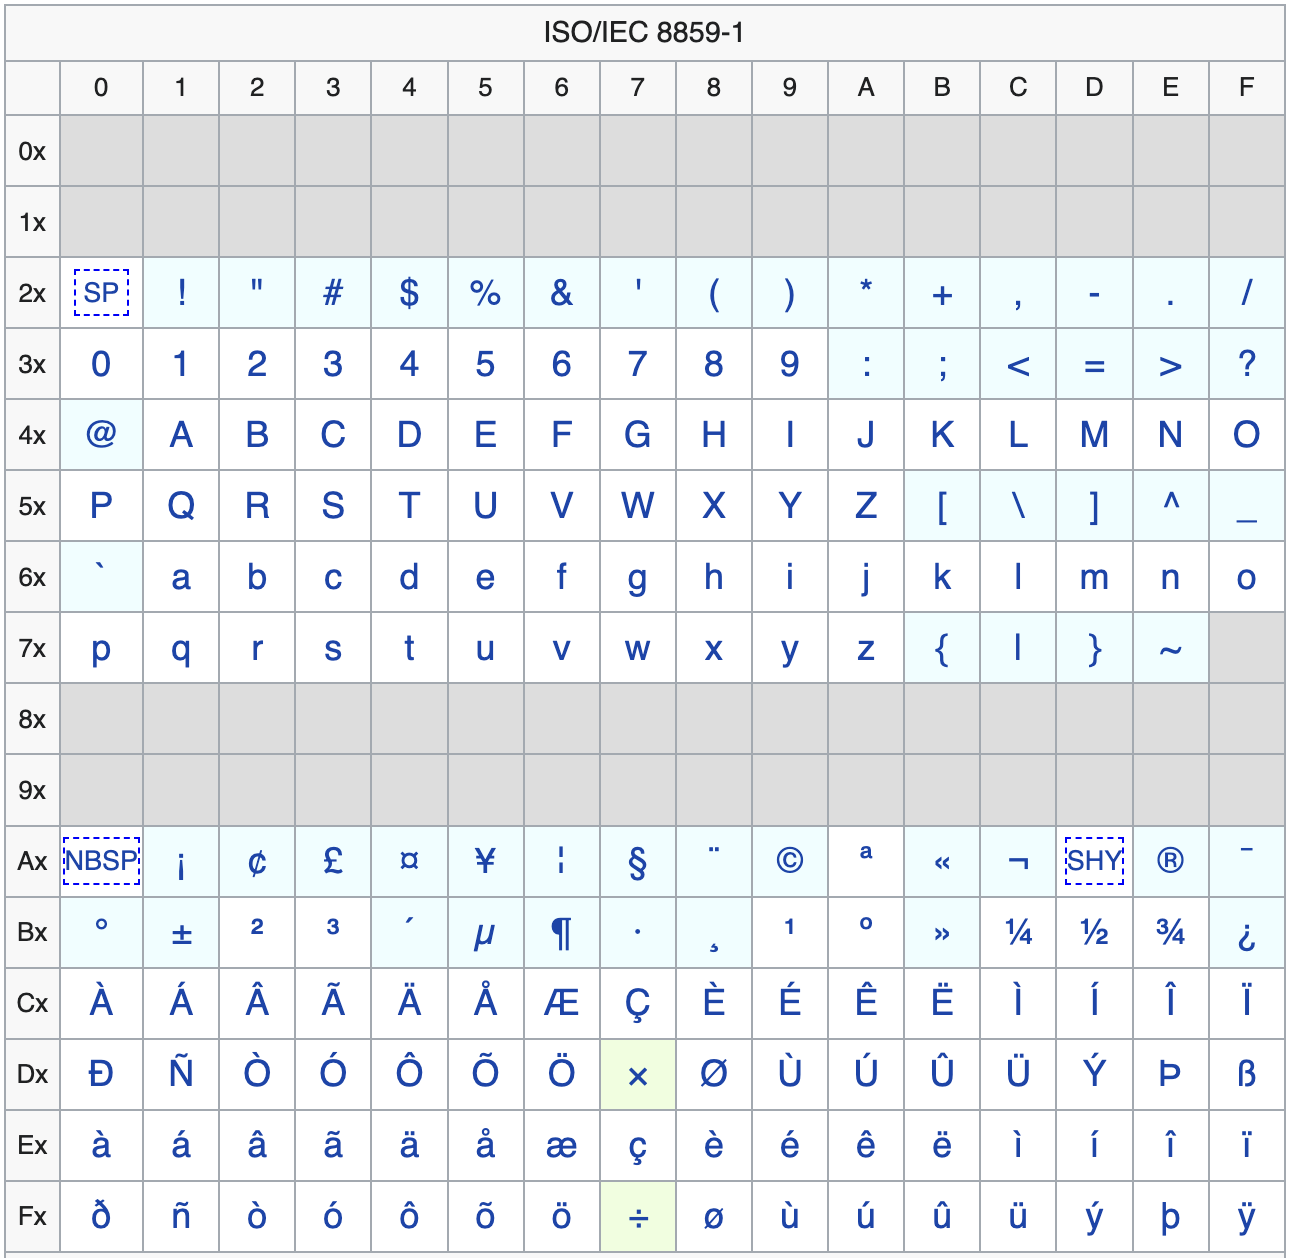 The ISO-8859-1 character set Source: Wikipedia
E.g. ö is encoded as 0xF6 or 246 in decimal. The gray blocks are the control codes.
Alright, we've decided to use the first 2 Unicode blocks spanning code points 0-255. All our C source code containing string literals will be stored UTF-8 encoded. And any text files we put into assets/ to be read by our demos will also be UTF-8 encoded. There are two minor complications.
The first complication is how C compilers handle string literals. When the compiler encounters something like const char *text = "Hello world", it will use a character encoding to turn the literal "Hello world" into a sequence of bytes embedded in the executable. Which encoding is chosen, depends on the compiler. By default, Clang and GCC convert the string literal to UTF-8 and embed the corresponding byte sequence. Clang even assumes that the source file encoding is UTF-8 and refuses to compile anything else. MSVC is ... different. Luckily, we do not care for MSVC in this series. If you do care for some reason, just make sure to pass /utf8 as a compiler flag to ensure MSVC embeds string literals as UTF-8 as well.
The second complication is actually reading the code points of a UTF-8 encoded text string, whether it comes from a C string literal or a UTF-8 encoded file read from disk. We have to deal with the multi-byte nature of the UTF-8 encoding, as code points above 127 are encoded as two bytes. Luckily, I've taken care of that with the function r96_next_utf8_character():
uint32_t r96_next_utf8_code_point(const char *data, uint32_t *index, uint32_t end) {
	static const uint32_t utf8_offsets[6] = {
			0x00000000UL, 0x00003080UL, 0x000E2080UL,
			0x03C82080UL, 0xFA082080UL, 0x82082080UL};

	uint32_t character = 0;
	const unsigned char *bytes = (const unsigned char *) data;
	int num_bytes = 0;
	do {
		character <<= 6;
		character += bytes[(*index)++];
		num_bytes++;
	} while (*index != end && ((bytes[*index]) & 0xC0) == 0x80);
	character -= utf8_offsets[num_bytes - 1];

	return character;
}
This function takes a sequence of bytes (data) encoding a UTF-8 string, an index into the byte sequence, and the last valid index (end). Both indices are byte offsets, not character offsets!
The function then reads the next UTF-8 character, which may be 1 to 4 bytes long, and returns its code point. Additionally, it increments the index accordingly, so we know at what byte offset the next character starts.
Note: I stole the original of this function many years ago from ... somewhere. I can not remember anymore. I've since modified it to my needs. To the original author: I'm deeply sorry I forgot who you are.
We can use this function to iterate all UTF-8 characters in a byte sequence and get their code points:
const char *utf8_text = "¡ÄÖ$\n\t";
uint32_t index = 0;
uint32_t end = strlen(utf8_text);
while (index != end) {
	uint32_t code_point = r96_next_utf8_code_point(utf8_text, &index, end);
	printf("code point: %i/%x\n", code_point, code_point);
}
Which prints the code point of each character in decimal and hexadecimal.
code point: 161/a1
code point: 196/c4
code point: 214/d6
code point: 36/24
code point: 10/a
code point: 9/9
As expected. Compare the output to the ISO-8859-1 chart above for validation.
This function can deal with any valid UTF-8 byte sequence and returns code points as a 32-bit unsigned integer. For our purposes, we are only interested in code points 0-255 and will ignore any other code points.
The glyph atlas
Alright, we have all our encoding bases covered. The next question is: how do we turn a code point like 64 (0x41) into the corresponding glyph image for the character A from a font, so we can blit it onto the screen?
To make things easy for us, we'll define some limits:
- We'll only render the printable Unicode code points between
0-255as described above. - We'll only use fixed-width or monospaced fonts. Each glyph in such a font has the same width. We can entirely ignore things like kerning this way.
- The font size is fixed.
With these limits in place, the basic idea of a glyph atlas goes like this:
- Pick a monospaced font, like the original IBM VGA 8x16 font.
- Use a glyph rendering library like FreeType to load the font and render out a glyph image for each printable Unicode code point between
0-255. - Pack those glyph images into a single image called the glyph atlas in some order which makes mapping from a code point to the glyph image coordinates inside the glyph atlas trivial.
Here's an example of what such a glyph atlas could look like.
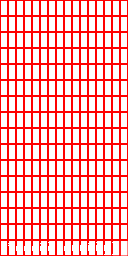
I've super-imposed a red grid de-marking each glyph's boundaries. An atlas we can use would not have that grid on it. The pixels of the glyph are fully opaque white (0xffffffff), while the background pixels are transparent (0x00000000);
The atlas above contains glyph images from the IBM VGA 8x16 font for the Unicode code points 0-255. Each glyph is 8x16 pixels in size. Each row consists of 16 glyphs. There are 16 rows in total, so 256 glyphs in total, one for each code point.
The glyphs in the first row map to code points 0-15, the glyphs in the second row map to code points 16-31, and so on. The first, second, ninth, and tenth row are empty, as these are the glyphs for non-printable control characters. The other rows contain the glyphs for all printable characters.
If you compare this glyph atlas with the ISO-8859-1 table above, you'll see that they are equivalent, except that the last glyph in the bottom right corner is missing from the atlas. The IBM VGA 8x16 font simply does not have a glyph for that code point.
So how do we generate this atlas? We don't. At least we won't write code for that as part of this series. I've already written a web tool based on FreeType that does exactly what we need. It's called Mario's (B)it(m)ap (F)ont (G)enerator (I'm a a dad, I'm allowed to name it like that) and you can run it in your browser here.
The tool lets you load a monospaced TrueType font, set the pixel height of the glyphs you want, and spits out a 16x14 grid of glyph images for the code points 32-255. It omits the code points 0-31 and thus the first two rows of the atlas as those are non-printable control codes anyways. The above atlas thus becomes this:
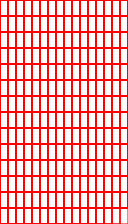
We're still wasting two rows in the middle for the second set of control codes. But keeping them around makes converting code points to glyph image coordinates easier.
We can store the generated glyph atlas as a .png file in the assets/ folder. I did just that using the file name assets/ibmvga.png. The generator also tells us that each glyph has a size of 8x16 pixels. We'll need to remember that for when we actually draw text later. Since the glyph atlas is a plain old image, we can load it via r96_image_init_from_file().
We're almost ready to render a text string. We need two more things:
* Being able to map a Unicode code point to a region in the glyph atlas image, where a region is defined by its top-left corner x- and y- pixel coordinates in the glyph atlas, and its width and height in pixels.
* Being able to not just blit an entire r96_image to another, but also blit regions of an r96_image to another r96_image.
Let's start with the mapping problem.
Note: We could put both the atlas and the glyph size information into some custom file format. I decided that's not worth it, so we'll go with a
.pngand some hard coded glyph sizes in the code.
Mapping code points to glyph atlas pixel coordinates
How can we map a code point to the pixel coordinates of the top left corner of a glyph image in the atlas?
Before we resolve pixel coordinates for a code point, it's actually easier to use a different coordinate system. Let's give each glyph in the atlas an x- and y-coordinate.
For our example glyph atlas in the last section above, each cell represents a glyph image of size 8x16 pixels. In the diagram, the cell shows both the glyph and its code point.
The top-left glyph image has coordinate (0, 0) and the bottom-right glyph image has coordinate (15, 13). We can define a simple equation that goes from glyph coordinates to code point, just like we did for pixel coordinates to pixel address:
code_point = glyph_x + glyph_y * glyphs_per_row + 32
Why the + 32? Because the first glyph has code point 32 (space). Without it, we'd get 0 for glyph_x = 0 and glyph_y = 0.
We can reverse this glyph coordinates to code point mapping as follows:
glyph_x = (code_point - 32) % glyphs_per_row;
glyph_y = (code_point - 32 - glyph_x) / glyphs_per_row;
The % glyphs_per_row basically strips the glyph_y * glyphs_per_row component from the original equation above, leaving us with the glyph x-coordinate.
To calculate glyph_y, we can then subtract the just calculated glyph_x, which gives us the code point of the first glyph in the row, and divide by glyphs_per_row to arrive at the glyph_y coordinate.
All that's left to get the pixel coordinate of the top left corner of a glyph is to multiply the glyph coordinates by the glyph pixel width and height of the font, 8 and 16 in the example above.
glyph_pixel_x = glyph_x * glyph_width;
glyph_pixel_y = glyph_x * glyph_height;
Blitting regions
Alright, we can generate glyph atlases for the first 255 Unicode code points, and we can calculate the pixel coordinates of a glyph image in the atlas corresponding to a code point. We also know the size of each glyph in pixels, as we specified that when generating the glyph atlas.
But we have one more problem: our current blitting functions can only blit an entire r96_image. What we need is blitting functions that blit just a region from a r96_image. Luckily, that's trivial, given our existing blitting functions! Here's a blitting function that blits a region from one r96_image to another.
void r96_blit_region(r96_image *dst, r96_image *src, int32_t dst_x, int32_t dst_y, int32_t src_x, int32_t src_y, int32_t src_width, int32_t src_height) {
	assert(src_x + src_width - 1 < src->width);
	assert(src_y + src_height - 1 < src->height);

	int32_t dst_x1 = dst_x;
	int32_t dst_y1 = dst_y;
	int32_t dst_x2 = dst_x + src_width - 1;
	int32_t dst_y2 = dst_y + src_height - 1;
	int32_t src_x1 = src_x;
	int32_t src_y1 = src_y;

	if (dst_x1 >= dst->width) return;
	if (dst_x2 < 0) return;
	if (dst_y1 >= dst->height) return;
	if (dst_y2 < 0) return;

	if (dst_x1 < 0) {
		src_x1 -= dst_x1;
		dst_x1 = 0;
	}
	if (dst_y1 < 0) {
		src_y1 -= dst_y1;
		dst_y1 = 0;
	}
	if (dst_x2 >= dst->width) dst_x2 = dst->width - 1;
	if (dst_y2 >= dst->height) dst_y2 = dst->height - 1;

	int32_t clipped_width = dst_x2 - dst_x1 + 1;
	int32_t dst_next_row = dst->width - clipped_width;
	int32_t src_next_row = src->width - clipped_width;
	uint32_t *dst_pixel = dst->pixels + dst_y1 * dst->width + dst_x1;
	uint32_t *src_pixel = src->pixels + src_y1 * src->width + src_x1;
	for (int32_t y = dst_y1; y <= dst_y2; y++) {
		for (int32_t i = 0; i < clipped_width; i++) {
			*dst_pixel++ = *src_pixel++;
		}
		dst_pixel += dst_next_row;
		src_pixel += src_next_row;
	}
}
This is basically our old r96_blit() function with additional arguments. We sepcify the destination (dst) and source (src) image as before. We also specify the coordinates (dst_x, dst_y) at which the source image should be blitted in the destination image. Those used to be called x and y. Finally, we specify the region from the source image we want to blit, given as its top-left corner (src_x, src_y) and width and height (src_width, src_height).
The implementation itself then only has three minor modifications compared to r96_blit().
The function starts with two asserts that ensure that the source region is valid. Next, dst_x2 and dst_y2 are calculated using the source region width and height instead of the source image width and height. Finally, src_x1 and src_y1 aren't initialized to 0, but to src_x and src_y.
That's it! The rest, including the clipping, is exactly the same as r96_blit(). We can already use this function to blit glyph images from the glyph atlas. And for some use cases, that'd be good enough.
However, if we only want to blit the white pixels of a glyph and ignore it's background pixels, we need color keying.
Easy, just copy r96_blit_keyed() and apply the same modifications.
void r96_blit_region_keyed(r96_image *dst, r96_image *src, int32_t dst_x, int32_t dst_y, int32_t src_x, int32_t src_y, int32_t src_width, int32_t src_height, uint32_t color_key) {
	assert(src_x + src_width - 1 < src->width);
	assert(src_y + src_height - 1 < src->height);

	int32_t dst_x1 = dst_x;
	int32_t dst_y1 = dst_y;
	int32_t dst_x2 = dst_x + src_width - 1;
	int32_t dst_y2 = dst_y + src_height - 1;
	int32_t src_x1 = src_x;
	int32_t src_y1 = src_y;

	if (dst_x1 >= dst->width) return;
	if (dst_x2 < 0) return;
	if (dst_y1 >= dst->height) return;
	if (dst_y2 < 0) return;

	if (dst_x1 < 0) {
		src_x1 -= dst_x1;
		dst_x1 = 0;
	}
	if (dst_y1 < 0) {
		src_y1 -= dst_y1;
		dst_y1 = 0;
	}
	if (dst_x2 >= dst->width) dst_x2 = dst->width - 1;
	if (dst_y2 >= dst->height) dst_y2 = dst->height - 1;

	int32_t clipped_width = dst_x2 - dst_x1 + 1;
	int32_t dst_next_row = dst->width - clipped_width;
	int32_t src_next_row = src->width - clipped_width;
	uint32_t *dst_pixel = dst->pixels + dst_y1 * dst->width + dst_x1;
	uint32_t *src_pixel = src->pixels + src_y1 * src->width + src_x1;
	for (dst_y = dst_y1; dst_y <= dst_y2; dst_y++) {
		for (int32_t i = 0; i < clipped_width; i++) {
			uint32_t src_color = *src_pixel;
			uint32_t dst_color = *dst_pixel;
			*dst_pixel = src_color != color_key ? src_color : dst_color;
			src_pixel++;
			dst_pixel++;
		}
		dst_pixel += dst_next_row;
		src_pixel += src_next_row;
	}
}
But we can do even better. No text rendering engine is complete without support for colored text! As is stands, we can only draw white text, as that's the color the glyph atlas generator spits out. On-top of color keying, we can also apply what's usually known as tinting.
We'll implement tinting in the simplest possible way: multiply the red, green, and blue color component of the source pixel with the red, green, and blue color component of the specified tinting color. That result of the multiplication is then normalized back to the 0-255 range for each component by dividing by 255. This effectively mixes the two colors.
tinted_red = ((source_red * tint_red) >> 8) & 0xff;
tinted_green = ((source_green * tint_green) >> 8) & 0xff;
tinted_blue = ((source_blue * tint_blue) >> 8) & 0xff;
Note: for the case of tinting glyphs images as generated by the generator, we could just write the tint color to the destination if the source pixel color doesn't match the color key. However, this approach above also works for tinting arbitrary source pixel colors. We'll see why that's useful in a later demo.
Here's the final region blitting routine, which takes both a color key and a tinting color:
void r96_blit_region_keyed_tinted(r96_image *dst, r96_image *src, int32_t dst_x, int32_t dst_y, int32_t src_x, int32_t src_y, int32_t src_width, int32_t src_height, uint32_t color_key, uint32_t tint) {
	assert(src_x + src_width - 1 < src->width);
	assert(src_y + src_height - 1 < src->height);

	int32_t dst_x1 = dst_x;
	int32_t dst_y1 = dst_y;
	int32_t dst_x2 = dst_x + src_width - 1;
	int32_t dst_y2 = dst_y + src_height - 1;
	int32_t src_x1 = src_x;
	int32_t src_y1 = src_y;

	if (dst_x1 >= dst->width) return;
	if (dst_x2 < 0) return;
	if (dst_y1 >= dst->height) return;
	if (dst_y2 < 0) return;

	if (dst_x1 < 0) {
		src_x1 -= dst_x1;
		dst_x1 = 0;
	}
	if (dst_y1 < 0) {
		src_y1 -= dst_y1;
		dst_y1 = 0;
	}
	if (dst_x2 >= dst->width) dst_x2 = dst->width - 1;
	if (dst_y2 >= dst->height) dst_y2 = dst->height - 1;

	uint32_t tint_r = R96_R(tint);
	uint32_t tint_g = R96_G(tint);
	uint32_t tint_b = R96_B(tint);

	int32_t clipped_width = dst_x2 - dst_x1 + 1;
	int32_t dst_next_row = dst->width - clipped_width;
	int32_t src_next_row = src->width - clipped_width;
	uint32_t *dst_pixel = dst->pixels + dst_y1 * dst->width + dst_x1;
	uint32_t *src_pixel = src->pixels + src_y1 * src->width + src_x1;
	for (dst_y = dst_y1; dst_y <= dst_y2; dst_y++) {
		for (int32_t i = 0; i < clipped_width; i++) {
			uint32_t src_color = *src_pixel;
			uint32_t dst_color = *dst_pixel;
			*dst_pixel = src_color != color_key ? R96_ARGB(
														  R96_A(src_color),
														  ((R96_R(src_color) * tint_r) >> 8) & 0xff,
														  ((R96_G(src_color) * tint_g) >> 8) & 0xff,
														  ((R96_B(src_color) * tint_b) >> 8) & 0xff)
												: dst_color;
			src_pixel++;
			dst_pixel++;
		}
		dst_pixel += dst_next_row;
		src_pixel += src_next_row;
	}
}
Since we've already extensively benchmarked and optimized the original blitter functions, and since these new functions only change some setup code, we have no need to do another optimization pass. Whew.
Alright, let's put everything we learned into a little demo.
Demo: Blitting regions
In this demo, we are going to blit the glyphs for the string "Hello world!" sourced from the glyph atlas in assets/ibmvga.png, which I generated via Mario's BMFG. We'll apply what we learned and created above, from iterating UTF-8 encoded characters, calculating pixel coordinates for glyphs from code points, to blitting regions in various ways.
Here's 13_blit_region.c:
#include <MiniFB.h>
#include <stdlib.h>
#include <string.h>
#include "r96/r96.h"

int main(void) {
	const int window_width = 320, window_height = 240;
	struct mfb_window *window = mfb_open("13_blit_region", window_width, window_height);
	r96_image output;
	r96_image_init(&output, window_width, window_height);

	r96_image glyph_atlas;
	int32_t glyph_width = 8;
	int32_t glyph_height = 16;
	int32_t glyphs_per_row = 16;
	r96_image_init_from_file(&glyph_atlas, "assets/ibmvga.png");

	do {
		r96_clear_with_color(&output, R96_ARGB(0xff, 0x22, 0x22, 0x22));

		const char *text = "Hello world!";
		uint32_t text_length = strlen(text);
		uint32_t char_index = 0;
		uint32_t x_offset = 100;
		while (char_index < text_length) {
			uint32_t code_point = r96_next_utf8_code_point(text, &char_index, text_length);
			int32_t glyph_x = (code_point - 32) % glyphs_per_row;
			int32_t glyph_y = (code_point - 32 - glyph_x) / glyphs_per_row;
			int32_t glyph_pixel_x = glyph_x * glyph_width;
			int32_t glyph_pixel_y = glyph_y * glyph_height;

			r96_blit_region(&output, &glyph_atlas, x_offset, 50, glyph_pixel_x, glyph_pixel_y, glyph_width, glyph_height);
			r96_blit_region_keyed(&output, &glyph_atlas, x_offset, 100, glyph_pixel_x, glyph_pixel_y, glyph_width, glyph_height, 0x0);
			r96_blit_region_keyed_tinted(&output, &glyph_atlas, x_offset, 150, glyph_pixel_x, glyph_pixel_y, glyph_width, glyph_height, 0x0, 0xffff00ff);
			x_offset += glyph_width;
		}

		if (mfb_update_ex(window, output.pixels, window_width, window_height) != STATE_OK) break;
	} while (mfb_wait_sync(window));
	return 0;
}
As usual, we start out by creating a window and an output r96_image to which we draw, which gets later drawn to the window.
Next, we define the properties of our glyph atlas and the glyphs contained there-in, and load the glyph atlas image.
In the main loop, we clear the output image, then iterate through the characters in the text string via r96_next_utf8_code_point(). We then calculate the glyph pixel coordinates for the code point in the glyph atlas and use that information to blit the glyph to the screen three times, using the normal blit, keyed blit, and keyed and tinted blit functions.
Take special note of x_offset. It specifies at what x-coordinate the next glyph will be blitted in the output image. As our font is monospaced, we can easily advance the drawing position on the x-axis by glyph_width. All glyphs have the same width. Variable width fonts are quite a bit more complex to get right in that regard.
And here is the web version.
Let's pack all of this up into re-useable code.
r96_font
Looking at the last demo, we can almost see a struct for fonts plop out:
r96_image glyph_atlas;
int32_t glyph_width = 8;
int32_t glyph_height = 16;
int32_t glyphs_per_row = 16;
This is the minimum information we need to store for a font to draw text with it, which translates to the following struct:
typedef struct r96_font {
	r96_image glyph_atlas;
	int32_t glyph_width, glyph_height;
	int32_t glyphs_per_row;
	int32_t tab_size;
} r96_font;
We load the glyph_atlas from an image file. glyph_width and glyph_height are parameters we'll need to specify when initializing the r96_image font. glyphs_per_row we can actually automatically deduce from the glyph atlas width and the glyph width, reducing the amount of parameters we need to specify when initializing a font. tab_size will make sense in a minute! Here's r96_font_init():
bool r96_font_init(r96_font *font, const char *path, int32_t glyph_width, int32_t glyph_height) {
	if (!r96_image_init_from_file(&font->glyph_atlas, path)) return false;
	font->glyph_width = glyph_width;
	font->glyph_height = glyph_height;
	font->glyphs_per_row = font->glyph_atlas.width / glyph_width;
	font->tab_size = 3;
	return true;
}
Unremarkable. And the corresponding r96_font_dispose():
void r96_font_dispose(r96_font *font) {
	r96_image_dispose(&font->glyph_atlas);
}
The rendering logic from the last example can be directly translated to a re-usable function. But we'll add two more features. We'll interpret \n and \t and adjust the rendering position for the next glyph accordingly.
void r96_text(r96_image *image, r96_font *font, const char *text, int32_t x, int32_t y, uint32_t tint) {
	int32_t cursor_x = x;
	int32_t cursor_y = y;
	uint32_t text_length = strlen(text);
	uint32_t index = 0;
	while (index < text_length) {
		uint32_t c = r96_next_utf8_code_point(text, &index, text_length);
		if (c == '\t') {
			cursor_x += font->tab_size * font->glyph_width;
			continue;
		}
		if (c == '\n') {
			cursor_x = x;
			cursor_y += font->glyph_height;
			continue;
		}
		if (c < 32 || c > 255) {
			cursor_x += font->glyph_width;
			continue;
		}

		int32_t glyph_index = c - 32;
		int32_t glyph_x = (glyph_index % font->glyphs_per_row);
		int32_t glyph_y = (glyph_index - glyph_x) / font->glyphs_per_row;
		glyph_x *= font->glyph_width;
		glyph_y *= font->glyph_height;

		r96_blit_region_keyed_tinted(image, &font->glyph_atlas, cursor_x, cursor_y, glyph_x, glyph_y, font->glyph_width, font->glyph_height, 0x0, tint);

		cursor_x += font->glyph_width;
	}
}
The function takes the image we want to render the text to, the font to render with, the text as a null-terminated UTF-8 string, and the x and y position to start rendering the first glyph at in the image. It's final parameter is the tint color.
Inside the function, we keep track of the position to render the next glyph at in cursor_x and cursor_y. We also keep track of the text length in bytes and the byte index from which we'll read the next Unicode code point from the text.
The loop then iterates over all code points in the text via r96_next_utf8_code_point(). In case we encounter \t, we advance the cursor position by font->tab_size * font->glyph_width and continue on to the next glyph. In case of \n, we reset cursor_x to the original x, essentially moving the cursor to the beginning of the text line. We then increase cursor_y by the glyph height to move it to the next line below. Yay, multi-line rendering!
Before we actually render the glyph for the current code point, we also check that the code point is within 32-255, so we don't try to draw a glyph that's not inside the glyph atlas.
The remainder of the function maps the code point to the glyph in the glyph atlas and uses r96_blit_region_keyed_tinted() to draw the glyph to the current cursor position. Finally, we advance the cursor by the glyph width.
Not counting the region blitting functions, the entire text rendering code code is about 70 LOC now. Let's add a few more lines of code.
In the previous demo, we positioned the glyphs at hard coded coordinates. If we wanted to center the text on the screen, or apply other alignments, we need to know the width and height of the text, also known as its bounds.
Let's write a little function that calculates exactly that.
void r96_font_get_text_bounds(r96_font *font, const char *text, int32_t *width, int32_t *height) {
	*width = 0;
	*height = font->glyph_height;
	int32_t current_line_width = 0;
	uint32_t text_length = strlen(text);
	uint32_t index = 0;
	while (index < text_length) {
		uint32_t c = r96_next_utf8_code_point(text, &index, text_length);
		if (c == '\t') {
			current_line_width += font->tab_size * font->glyph_width;
			continue;
		}
		if (c == '\n') {
			*width = current_line_width > *width ? current_line_width : *width;
			*height += font->glyph_height;
			current_line_width = 0;
			continue;
		}
		current_line_width += font->glyph_width;
	}
	*width = current_line_width > *width ? current_line_width : *width;
}
The function takes the font that the text will be rendered with, as well as pointers width and height to which we write the calculated bounds.
The function then mirrors parts of the rendering logic in r96_text(), calculating the maximum line width, as well as how many lines there actually are.
Alright, let's use all this in a little demo.
Demo: using r96_font and friends
Here's 14_fonts.c, our cute font demo:
#include <MiniFB.h>
#include <stdlib.h>
#include "r96/r96.h"

int main(void) {
	const int window_width = 320, window_height = 240;
	struct mfb_window *window = mfb_open("14_fonts", window_width, window_height);
	r96_image output;
	r96_image_init(&output, window_width, window_height);
	r96_font font;
	r96_font_init(&font, "assets/ibmvga.png", 8, 16);

	do {
		r96_clear_with_color(&output, R96_ARGB(0xff, 0x22, 0x22, 0x22));

		const char *text = "The quick brown fox jumps\nover the lazy dog\n"
						   "¡¢£¤¥¦§¨©ª«¬\n"
						   "ÀÁÂÃÄÅÆÇÈÉÊËÌÍÎÏ";

		int32_t text_x, text_y, text_width, text_height;
		r96_font_get_text_bounds(&font, text, &text_width, &text_height);
		text_x = window_width / 2 - text_width / 2;
		text_y = window_height / 2 - text_height / 2;

		r96_rect(&output, text_x, text_y, text_width, text_height, R96_ARGB(0xff, 0xff, 0x0, 0xff));
		r96_text(&output, &font, text, text_x + 1, text_y + 1, 0x00000000);
		r96_text(&output, &font, text, text_x, text_y, 0xffffffff);

		if (mfb_update_ex(window, output.pixels, window_width, window_height) != STATE_OK) break;
	} while (mfb_wait_sync(window));
	return 0;
}
We start off by loading the font in line 11, specifying the glyph atlas image path, the glyph width, and the glyph height. r96_font_init loads the glyph atlas image and sets up all the fields of the font as we saw earlier.
In the main loop, we clear the output image, then define the text we want to render. The text consists of 3 lines, using characters from the code point range we support.
The next block of code calculates the bounds of the text via r96_font_get_text_bounds(), which we use to calculate the text's top-left corner position in such a way, that the text is centered in the middle of the screen.
In the final block, we render a background rectangle using the text bounds, followed by rendering the text offset by 1 pixel on both axes with a black tint. Finally, we render the text at the calculated position with a white tint. Rendering the text twice this way gives us a simple shadow effect. Here's the demo running on the web.
Great success.
Demo: fun with fonts
While the original IBM VGA font is nice, it's also a bit of an outdated, and dare I say boring look.
I've added two more glyph atlases to the assets/ folder. The first one is derived from the awesome Tamzen font (assets/tamzen.png).
It has a lighter, more modern appearance and is well suited to display stats, like performance counters.
The other font was ripped from some old demo from the 90ies by Ian Hanschen. He's put up a GitHub repo with a gargantuan amount of ripped fonts. Most of them do not have attribution. This is the one I picked (assets/demofont.png).

Each font is basically just a glyph atlas. However, the atlas layout doesn't match the one generated by BMFG.
For the font I picked, we see that it only contains glyphs for the first few code points. Instead of 16 glyphs, it contains 20 glyphs per row. Thankfully, r96_init_font() can deal with this by calculating the number of glyphs per row based on the glyph atlas width and glyph width. The only thing we need to watch out for is to not use any code points that go above Z in our text strings.
This demo doesn't come with an explanation. Consider it to be a puzzle for your brain noggins! Can you figure out how it works? 15_font_fun.c:
#include <MiniFB.h>
#include <stdlib.h>
#include <string.h>
#include <math.h>
#include "r96/r96.h"

int main(void) {
	const int window_width = 320, window_height = 240;
	struct mfb_window *window = mfb_open("15_font_fun", window_width, window_height);
	r96_image output;
	r96_image_init(&output, window_width, window_height);
	r96_font font;
	r96_font_init(&font, "assets/demofont.png", 16, 16);
	float counter = 0;
	struct mfb_timer *timer = mfb_timer_create();
	do {
		r96_clear_with_color(&output, R96_ARGB(0xff, 0x22, 0x22, 0x22));

		const char *text = "--(2022 DEMO CREW)--";
		int32_t text_x = 0;
		uint32_t text_length = strlen(text);
		uint32_t char_index = 0;
		while (char_index < text_length) {
			char character[] = {0, 0};
			character[0] = (char) r96_next_utf8_code_point(text, &char_index, text_length);
			int32_t text_y = output.height / 2 - font.glyph_width / 2 + (int32_t) (sinf(counter + char_index / 10.0f) * output.height / 4);
			r96_text(&output, &font, character, text_x, text_y, 0xffffffff);
			text_x += font.glyph_width;
		}

		counter += M_1_PI * mfb_timer_delta(timer) * 12;
		mfb_timer_reset(timer);

		if (mfb_update_ex(window, output.pixels, window_width, window_height) != STATE_OK) break;
	} while (mfb_wait_sync(window));
	return 0;
}
And here it is in action.
Next time on "Mario writes a lot of words"
Our little code base is shaping up to be kinda useful. Next time, we're going to look into drawing lines. Possibly with sub-pixel precision. Unless I can't figure that out.